

How To Allow Tftp In Windows 10 Firewall
When transferring files beyond a network then TFTP is a good solution due to its ease of use and easy configuration.
TFTP, or Trivial File Send Protocol, is a way of sending and receiving files over the cyberspace. Information technology is especially useful in situations where the remote computer that is receiving the file is unmanned.
This makes sending files very piece of cake and does not crave homo intervention on the other end if configured correctly. The downside is that the protocol is not secure. (If security is a concern then you should expect at transfer methods that use encryption.)
If you lot do a lot of file transfers over your home or business network, so TFTP is a good way to go.
In order to demonstrate this method of file copying and transferring, we volition be using a gratuitous TFTP tool provided by SolarWinds TFTP. It is a quick and easy fashion to go the chore done, and then we will exist downloading it from here.
All-time of all is that this app is gratis, so using information technology will certainly not break the banking company. Let'southward get started.
![]()
via Solarwinds.com 100% Free
Later on you lot download, install the package on your PC and lets get started with the configure.
Before Nosotros Begin:
In that location are a couple of things that we demand to do before nosotros tin become started. This is all very easy to do and so don't permit these steps scare you lot off. The whole procedure should only take a few minutes and is very uncomplicated to get done. Yous will therefore demand:
- Access to the Administrator account:
This is easy to do. If y'all are the only person using your computer and then the chances that you lot are the ambassador of your account is pretty high. - Download and Install SolarWinds TFTP Server:
In order to employ the SolarWinds TFTP Server nosotros will obviously demand to download and install it to the reckoner. The download link can be found in a higher place in the intro section. - You will need Port Forwarding for External Connections:
If you are planning on using remote connections with your TFTP server then yous volition demand to use port forwarding. UDP Port 69 is the port blazon and port number that you will need to use. It volition demand to point to the IP address of your server on your network from your router in gild to allow users from outside of the network. If you just need internal connections, then don't worry near this step as it is non needed.
Now we can get started with the residuum of the setup!
What Kind of Connexion Practise You lot Need to Configure?
For external connections you will need to ensure that you lot configure the security settings accordingly in the awarding. You tin can select which IP addresses tin transport and receive files to aid specify which valid hosts tin transfer and receive.
Basic TFTP Server Setup
These steps volition guide you lot through the setup process of SolarWinds TFTP Server. This will help you lot get the ball rolling and allow you to eventually make transfers beyond multiple networks possible.
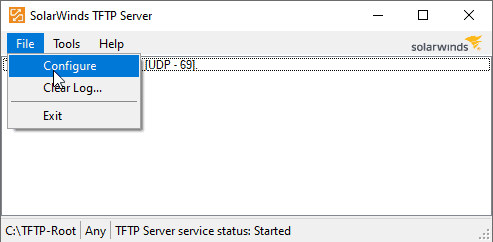
- Open the SolarWinds TFTP application
- Next, click file -> configure.
- Cull the correct settings equally highlighted in the post-obit screen capture labelled i, 2 and 3.
- one Shows the condition of the TFTP service, 2 allows you lot to set the icon to appear in the taskbar and 3 is where the files will be stored by default. Y'all can choose a unlike location if you lot want. We will exist leaving ours as the default location but feel free to make any changes if you demand to. A popular pick for example is the Downloads folder.

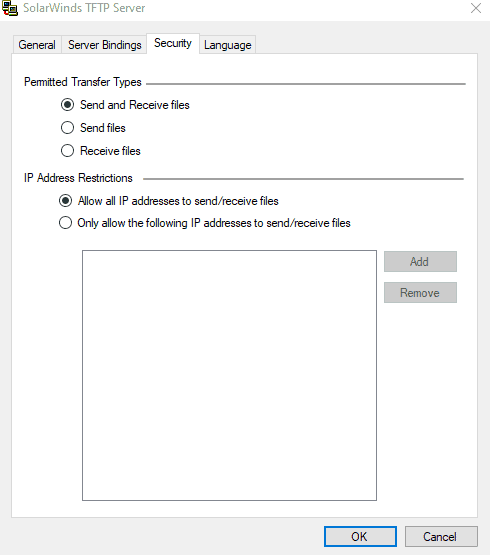
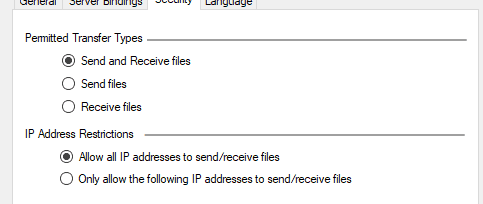
- The next step is locking down some security items. To practice that, we need to become to the, you guessed information technology, security tab within the SolarWinds TFTP Server.
- This part is pretty self explanatory, but definitely worth looking into. Nosotros need to set the deportment that we want this estimator to be able to complete. If you are setting upwards permissions for a file server, then you might not want anybody to accept admission to ship files to it, and instead you might but desire it to server files and have them downloadable. If that is the case then you volition want to choose transport files. If you desire to do both and so select Send and Receive files.
- You tin further lock downwardly the security of your TFTP server past specifying which IP addresses are allowed to transfer files. You can practise this by selecting a range of both IPv4 and IPv6 IP addresses. Our example uses IPv4 and allows ten IP addresses to transport and receive files across the network.
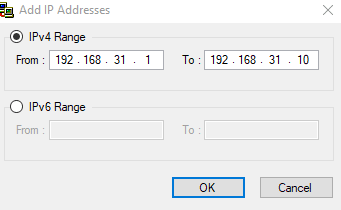
- We enter the range and and so set the changes past clicking the OK push button. Easy.
We accept now configured our TFTP server in just a few uncomplicated clicks.
The Fun Office: Actually Utilizing Our New TFTP Server
The setup was pretty straight forward, and using the application is merely as easy. Let'due south go through the steps to make using our TFTP server a reality.
Port Forwarding Steps
This function is optional considering y'all might not desire to admission your files from outside the network. This is understandable, especially because TFTP is not designed to be a secure protocol, just a convenient one. However, you tin can add together mappings to port 69 in your router by either finding the NAT or Port Forwarding sections of your router. Each manufacturer is dissimilar, then be sure to consult your user transmission when attempting to make changes to your router. If in doubtfulness and then contact your manufacturer'south support and see if they tin help you with the changes.
For everyone else, lets carry on with our tutorial!
Installing a suitable TFTP Client for Windows
The easiest way to keep is to use the default Windows TFTP that comes with the Operating System. To access information technology and install it onto our reckoner nosotros need to practise the following:
- Open the offset carte du jour and search for the control panel.
- Find Programs and Features and so click on Turn Windows features on or off.
- Find the TFTP customer and click on the tick box and then that the tick is visible.
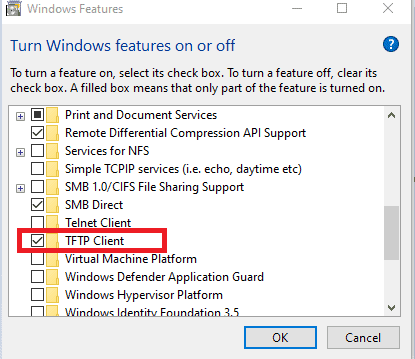
- Next, Click on OK to install the client.
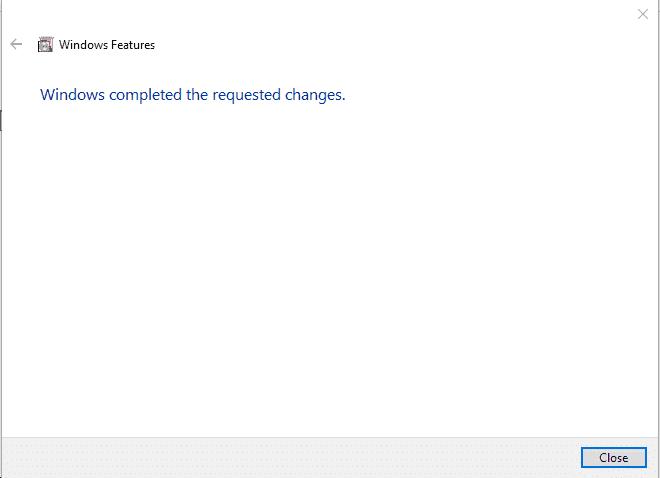
- Once finished, you take installed the customer.
Of import to annotation that this is the computer without the TFTP server awarding running, also known as the client PC.
Let TFTP with a Firewall Configuration Alter
There are 2 approaches to getting this right. The get-go and easiest fashion is to disable your Windows Firewall. This might be OK in a home setup where you trust all of your devices on the network, or in a corporate surround where management is conducted by the IT section. If y'all are not willing to do this, and then we tin can create specific rules in our Windows firewall to allow traffic through.
- Click on the first menu and blazon in Control Panel, then click on that icon when information technology appears.
- Click on Windows Defender Firewall.
- Next, click on Turn Windows Defender on or off.
- Tick the boxes as seen below and then click ok
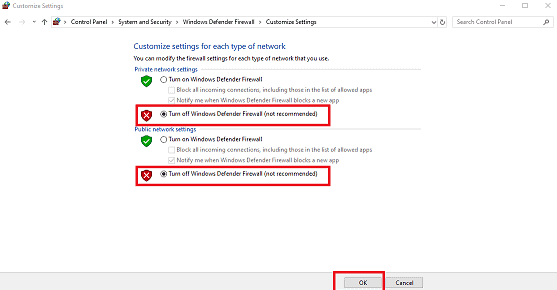
- You have at present turned off yous firewall.
- If you don't feel comfortable turning off Windows Firewall we create an exception instead. To do this, we must click on Allow an app or feature through Windows Defender Firewall' in the Windows Firewall settings.
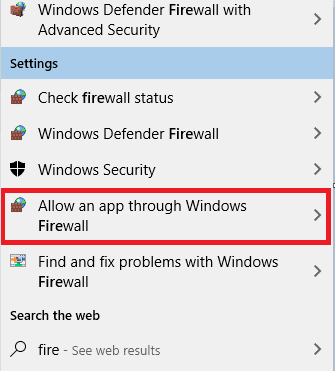
- Click on the Change settings button to add together a programme.
- Next you must click on Allow another appand then hitting Scan.
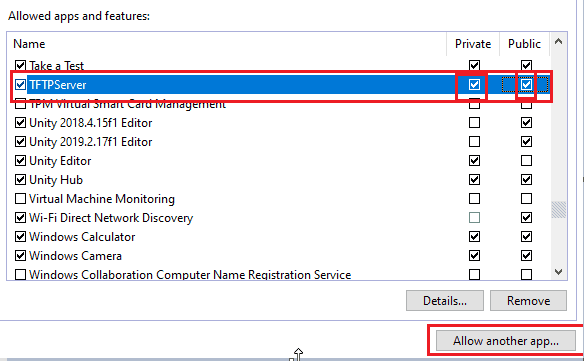
- Select exein the Windows system32 directory and besides TFTPServer in the SolarWinds folder inside Program Files x86.
- Click open and it has been added.
- Tick the boxes called Privateand To terminate, click ok.
Transferring Files using TFTP
Permit us now exercise some local tests with the following commands.
- Printing the windows key or click on the start bill of fare
- Blazon cmd and printing enter
- You will see a black cmd terminal in front of you. This is where nosotros volition type in our commands.
- Change directories to the path where your files are stored for sending and receiving. Let us now send a file. To do this, nosotros apply the 'put' command.
tftp -i 192.168.31.46 put "Test_File".mp3
![]()
- If you want to receive a file, and then the control nosotros will utilise is called 'get'.
tftp -i 192.168.31.46 go "Test_File".mp3
![]()
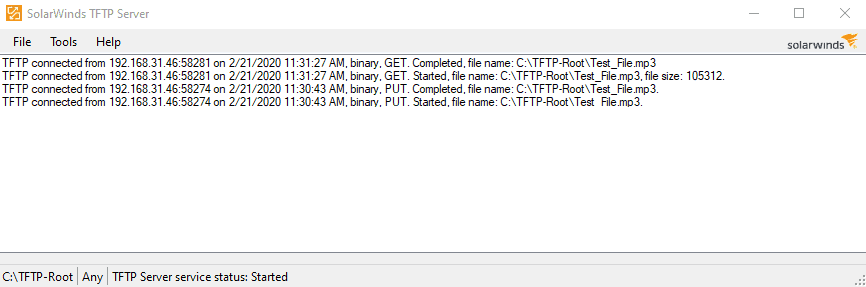
Nosotros can look at our TFTP Server logs that display when we open our server app and we are greeted with the following records:
Conclusion
Transferring files by using TFTP is easy, fun and complimentary. By leveraging the free TFTP server from SolarWinds, we tin turn any ordinary PC into a file server with remote admission capabilities.
This is useful for many reasons, and we hope that the tutorial will help y'all to become the correct access levels set for your own specific needs. Be sure to download the app from above then that you can follow forth with this tutorial.
Better even so, check out SolarWinds and look at the multitude of monitoring, troubleshooting and control software that they accept on offer. You are bound to notice the right tool for the job, regardless of what you are trying to accomplish!
Happy file transferring, and we'll see you adjacent time.
Source: https://www.ittsystems.com/setup-configure-tftp-on-windows-10/
Posted by: taylorshantoote1978.blogspot.com
0 Response to "How To Allow Tftp In Windows 10 Firewall"
Post a Comment